Epydoc
Automatic API Documentation Generation for Python
| Author: | Edward Loper |
|---|---|
| Version: | 3.0b1 |
Abstract
Epydoc is a tool for generating API documentation for Python modules, based on their docstrings. For an example of epydoc's output, see the API documentation for epydoc itself (html, pdf). A lightweight markup language called epytext can be used to format docstrings, and to add information about specific fields, such as parameters and instance variables. Epydoc also understands docstrings written in reStructuredText, Javadoc, and plaintext. For a more extensive example of epydoc's output, see the API documentation for Python 2.4.
Contents
- 1 Installing Epydoc
- 2 Using Epydoc
- 3 Python Docstrings
- 4 The Epytext Markup Language
- 5 Epydoc Fields
- 6 Alternate Markup Languages
- 7 References
1 Installing Epydoc
1.1 Downloading Epydoc
Epydoc can be downloaded from the SourceForge download page. Epydoc is available in five formats:
- RPM (.noarch.rpm)
- Windows installer (.win32.exe)
- Source install (.tar.gz)
- Source install (.zip)
- Source RPM (.src.rpm)
If you are installing on RedHat, I recommend that you use the RPM file. If you are installing on Windows, I recommended that you use the windows installer. Otherwise, you should use one of the source install files.
1.2 Getting Epydoc from Subversion
If you wish to keep up on the latest developments, you can get the latest version of epydoc from the subversion repository:
[/home/edloper]$ svn co https://epydoc.svn.sourceforge.net/svnroot/epydoc/trunk/epydoc epydoc
[/home/edloper]$ ls epydoc
Makefile  doc  man  sandbox  src
This will create a directory named epydoc containing the latest version of epydoc. The epydoc package itself is in epydoc/src/epydoc (so adding epydoc/src to your PYTHONPATH will let you use it). You should periodically update your copy of the subversion repository, to make sure you have all the latest changes:
[/home/edloper/epydoc]$ svn up
You can browse the subversion repository here.
1.3 Installing from the RPM File
Download the RPM file to a directory of your choice.
Use rpm to install the new package.
[/tmp]$ su
Password:
[/tmp]# rpm -i epydoc-3.0.1.noarch.rpm
Once epydoc is installed, you can delete the RPM file.
[/tmp]# rm epydoc-3.0.1.rpm
1.4 Installing from the Windows Installer
- Download and run epydoc-3.0.1.win32.exe.
- Follow the on-screen instructions. Epydoc will be installed in the epydoc subdirectory of your Python installation directory (typically C:\Python24\).
- The Windows installer creates two scripts in the Scripts subdirectory of your Python installation directory: epydoc.pyw opens the graphical user interface, and epydoc.py calls the command line interface. If you'd like, you can create shortcuts from these scripts to more convenient locations (such as your desktop or start menu).
- Once epydoc is installed, you can delete epydoc-3.0.1.win32.exe.
1.5 Installing from the Source Distribution (using make)
Download an epydoc source distribution to a directory of your choice, and uncompress it.
[/tmp]$ wget -q http://prdownloads.sourceforge.net/epydoc/epydoc-3.0.1.tar.gz
[/tmp]$ gunzip epydoc-3.0.1.tar.gz
[/tmp]$ tar -xvf epydoc-3.0.1.tar
Use make install in the eydoc-3.0.1/ directory to install epydoc.
[/tmp]$ cd epydoc-3.0.1/
[/tmp/epydoc-3.0.1]$ su
Password:
[/tmp/epydoc-3.0.1]# make install
running install
running build
[...]
copying build/scripts/epydoc -> /usr/bin
changing mode of /usr/bin/epydoc to 100775
If you'd like to keep a local copy of the documentation, then use make installdocs. By default, this will install the documentation to /usr/share/doc/ and the man pages to /usr/share/man/. If you would prefer to install documentation to different directories (such as /usr/lib/doc), then edit the MAN and DOC variables at the top of Makefile before running make installdocs.
[/tmp/epydoc-3.0.1]# make installdocs
Once epydoc is installed, you can delete the installation directory and the source distribution file.
[/tmp/epydoc-3.0.1]# cd ..
[/tmp]# rm -r epydoc-3.0.1
[/tmp]# rm epydoc-3.0.1.tar
1.6 Installing from the Source Distribution (without make)
Download an epydoc source distribution to a directory of your choice, and uncompress it.
[/tmp]$ wget -q http://prdownloads.sourceforge.net/epydoc/epydoc-3.0.1.tar.gz
[/tmp]$ gunzip epydoc-3.0.1.tar.gz
[/tmp]$ tar -xvf epydoc-3.0.1.tar
Use the setup.py script in the eydoc-3.0.1/ directory to install epydoc.
[/tmp]$ cd epydoc-3.0.1/
[/tmp/epydoc-3.0.1]$ su
Password:
[/tmp/epydoc-3.0.1]# python setup.py install
running install
running build
[...]
copying build/scripts/epydoc -> /usr/bin
changing mode of /usr/bin/epydoc to 100775
[/tmp/epydoc-3.0.1]# cd ..
[/tmp]#
If you'd like to keep a local copy of the documentation, then copy it to a permanant location, such as /usr/share/doc/. You may also want to copy the man pages to a permanant location, such as /usr/share/man/.
[/tmp]# cp -r epydoc-3.0.1/doc/ /usr/share/doc/epydoc/
[/tmp]# cp epydoc-3.0.1/man/* /usr/share/man/
Once epydoc is installed, you can delete the installation directory and the source distribution file.
[/tmp]# rm -r epydoc-3.0.1
[/tmp]# rm epydoc-3.0.1.tar
1.7 Installing on Debian
Epydoc 2.1 is available as a testing debian package (python-epydoc). The epydoc documentation is also available as a package (epydoc-doc).
2 Using Epydoc
Epydoc provides two user interfaces:
- The command line interface, which is accessed via a script named epydoc (or epydoc.py on Windows)
- The graphical interface, which is accessed via a script named epydocgui (or epydoc.pyw on Windows).
Epydoc can also be accessed programmatically; see epydoc's API documentation for more information.
2.1 The Command Line Interface
The epydoc script extracts API documentation for a set of Python objects, and writes it using a selected output format. Objects can be named using dotted names, module filenames, or package directory names. (On Windows, this script is named epydoc.py.)
2.1.1 Command Line Usage (Abbreviated)
epydoc [--html|--pdf] [-o DIR] [--parse-only|--introspect-only] [-v|-q]
       [--name NAME] [--url URL] [--docformat NAME] [--graph GRAPHTYPE]
       [--inheritance STYLE] [--config FILE] OBJECTS...
- OBJECTS...
- A list of the Python objects that should be documented. Objects can be specified using dotted names (such as os.path), module filenames (such as epydoc/epytext.py), or package directory names (such as epydoc/). Packages are expanded to include all sub-modules and sub-packages.
| --html | Generate HTML output. (default) |
| Generate Adobe Acrobat (PDF) output, using LaTeX. | |
| -o DIR, --output DIR, --target DIR | |
| The output directory. | |
| --parse-only, --introspect-only | |
| By default, epydoc will gather information about each Python object using two methods: parsing the object's source code; and importing the object and directly introspecting it. Epydoc combines the information obtained from these two methods to provide more complete and accurate documentation. However, if you wish, you can tell epydoc to use only one or the other of these methods. For example, if you are running epydoc on untrusted code, you should use the --parse-only option. | |
| -v, -q | Increase (-v) or decrease (-q) the verbosity of the output. These options may be repeated to further increase or decrease verbosity. Docstring markup warnings are supressed unless -v is used at least once. |
| --name NAME | The documented project's name. |
| --url URL | The documented project's URL. |
| --docformat NAME | |
| The markup language that should be used by default to process modules' docstrings. This is only used for modules that do not define the special __docformat__ variable; it is recommended that you explicitly specify __docformat__ in all your modules. | |
| --graph GRAPHTYPE | |
Include graphs of type GRAPHTYPE in the generated output. Graphs are generated using the Graphviz dot executable. If this executable is not on the path, then use --dotpath to specify its location. This option may be repeated to include multiple graph types in the output. To include all graphs, use --graph all. The available graph types are:
| |
| --inheritance STYLE | |
The format that should be used to display inherited methods, variables, and properties. Currently, three styles are supported. To see an example of each style, click on it: | |
| --config FILE | Read the given configuration file, which can contain both options and Python object names. This option may be used multiple times, if you wish to use multiple configuration files. See Configuration Files for more information. |
The complete list of command line options is available in the Command Line Usage section.
2.1.2 Examples
The following command will generate HTML documentation for the sys module, and write it to the directory sys_docs:
[epydoc]$ epydoc --html sys -o sys_docs
The following commands are used to produce the API documentation for epydoc itself. The first command writes html output to the directory html/api, using epydoc as the project name and http://epydoc.sourcforge.net as the project URL. The white CSS style is used; inheritance is displayed using the listed style; and all graphs are included in the output. The second command writes pdf output to the file api.pdf in the directory latex/api, using Epydoc as the project name.
[epydoc]$ epydoc -v -o html/api --name epydoc --css white \
                 --url http://epydoc.sourceforge.net \
                 --inheritance listed --graph all src/epydoc
[epydoc]$ epydoc -v -o latex/api --pdf --name "Epydoc" src/epydoc
2.1.3 Configuration Files
Configuration files, specified using the --config option, may be used to specify both the list of objects to document, and the options that should be used to document them. Configuration files are read using the standard ConfigParser module. The following is a simple example of a configuration file.
[epydoc] # Epydoc section marker (required by ConfigParser)

# Information about the project.
name: My Cool Project
url: http://cool.project/

# The list of modules to document.  Modules can be named using
# dotted names, module filenames, or package directory names.
# This option may be repeated.
modules: sys, os.path, re
modules: my/project/driver.py

# Write html output to the directory "apidocs"
output: html
target: apidocs/

# Include all automatically generated graphs.  These graphs are
# generated using Graphviz dot.
graph: all
dotpath: /usr/local/bin/dot
A more complete example, including all of the supported options, is also available.
2.2 The Graphical Interface
Epydoc also includes a graphical interface, for systems where command line interfaces are not convenient (such as Windows). The graphical interface can be invoked with the epydocgui command, or with epydoc.pyw in the Scripts subdirectory of the Python installation directory under Windows. Currently, the graphical interface can only generate HTML output.
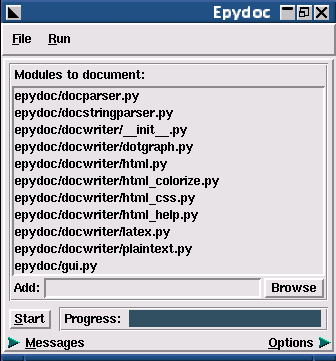
Use the Add box to specify what objects you wish to document. Objects can be specified using dotted names (such as os.path), module filenames (such as epydoc/epytext.py), or package directory names (such as epydoc/). Packages are expanded to include all sub-modules and sub-packages. Once you have added all of the modules that you wish to document, press the Start button. Epydoc's progress will be displayed on the progress bar.
To customize the output, click on the Options arrow at the bottom of the window. This opens the options pane, which contains fields corresponding to each command line option.

The epydoc graphical interface can save and load project files, which record the set of modules and the options that you have selected. Select File->Save to save the current modules and options to a project file; and File->Open to open a previously saved project file. (These project files do not currently use the same format as the configuration files used by the command line interface.)
For more information, see the epydocgui(1) man page.
2.3 Documentation Completeness Checks
The epydoc script can be used to check the completeness of the reference documentation. In particular, it will check that every module, class, method, and function has a description; that every parameter has a description and a type; and that every variable has a type. If the -p option is used, then these checks are run on both public and private objects; otherwise, the checks are only run on public objects.
epydoc --check [-p] MODULES...
- MODULES...
- A list of the modules that should be checked. Modules may be specified using either filenames (such as epydoc/epytext.py) or module names (such as os.path). The filename for a package is its __init__.py file.
| -p | Run documentation completeness checks on private objects. |
For each object that fails a check, epydoc will print a warning. For example, some of the warnings generated when checking the completeness of the documentation for epydoc's private objects are:
epydoc.html.HTML_Doc._dom_link_to_html........No docs
epydoc.html.HTML_Doc._module..................No type
epydoc.html.HTML_Doc._link_to_html.link.......No descr
epydoc.html.HTML_Doc._author.return...........No type
epydoc.html.HTML_Doc._author.authors..........No descr, No type
epydoc.html.HTML_Doc._author.container........No descr, No type
epydoc.html.HTML_Doc._base_tree.uid...........No descr, No type
epydoc.html.HTML_Doc._base_tree.width.........No descr, No type
epydoc.html.HTML_Doc._base_tree.postfix.......No descr, No type
If you'd like more fine-grained control over what gets checked, or you would like to check other fields (such as the author or version), then you should use the DocChecker class directly.
2.4 HTML Files
Every Python module and class is documented in its own file. Index files, tree files, a help file, and a frames-based table of contents are also created. The following list describes each of the files generated by epydoc:
- index.html
- The standard entry point for the documentation. Normally, index.html is a copy of the frames file (frames.html). But if the --no-frames option is used, then index.html is a copy of the API documentation home page, which is normally the documentation page for the top-level package or module (or the trees page if there is no top-level package or module).
- module-module.html
- The API documentation for a module. module is the complete dotted name of the module, such as sys or epydoc.epytext.
- class-class.html
- The API documentation for a class, exception, or type. class is the complete dotted name of the class, such as epydoc.epytext.Token or array.ArrayType.
- module-pysrc.html
- A page with the module colorized source code, with links back to the objects main documentation pages. The creation of the colorized source pages can be controlled using the options --show-sourcecode and --no-sourcecode.
- module-tree.html
- The documented module hierarchy.
- class-tree.html
- The documented classes hierarchy.
- identifier-index.html
- The index of all the identifiers found in the documented items.
- term-index.html
- The index of all the term definition found in the docstrings. Term definitions are created using the Indexed Terms markup.
- bug-index.html
- The index of all the known bug in the documented sources. Bugs are marked using the @bug tag.
- todo-index.html
- The index of all the to-do items in the documented sources. They are marked using the @todo tag.
- help.html
- The help page for the project. This page explains how to use and navigate the webpage produced by epydoc.
- epydoc-log.html
- A page with the log of the epydoc execution. It is available clicking on the timestamp below each page, if the documentation was created using the --include-log option. The page also contains the list of the options enabled when the documentation was created.
- api-objects.txt
- A text file containing each available item and the URL where it is documented. Each item takes a file line and it is separated by the URL by a tab charecter. Such file can be used to create external API links.
- redirect.html
- A page containing Javascript code that redirect the browser to the documentation page indicated by the accessed fragment. For example opening the page redirect.html#epydoc.apidoc.DottedName the browser will be redirected to the page epydoc.apidoc.DottedName-class.html.
- frames.html
- The main frames file. Two frames on the left side of the window contain a table of contents, and the main frame on the right side of the window contains API documentation pages.
- toc.html
- The top-level table of contents page. This page is displayed in the upper-left frame of frames.html, and provides links to the toc-everything.html and toc-module-module.html pages.
- toc-everything.html
- The table of contents for the entire project. This page is displayed in the lower-left frame of frames.html, and provides links to every class, type, exception, function, and variable defined by the project.
- toc-module-module.html
- The table of contents for a module. This page is displayed in the lower-left frame of frames.html, and provides links to every class, type, exception, function, and variable defined by the module. module is the complete dotted name of the module, such as sys or epydoc.epytext.
- epydoc.css
- The CSS stylesheet used to display all HTML pages.
2.5 CSS Stylesheets
Epydoc creates a CSS stylesheet (epydoc.css) when it builds the API documentation for a project. You can specify which stylesheet should be used using the --css command-line option. If you do not specify a stylesheet, and one is already present, epydoc will use that stylesheet; otherwise, it will use the default stylesheet.
3 Python Docstrings
Python documentation strings (or docstrings) provide a convenient way of associating documentation with Python modules, functions, classes, and methods. An object's docsting is defined by including a string constant as the first statement in the object's definition. For example, the following function defines a docstring:
def x_intercept(m, b):
    """
    Return the x intercept of the line y=m*x+b.  The x intercept of a
    line is the point at which it crosses the x axis (y=0).
    """
    return -b/m
Docstrings can be accessed from the interpreter and from Python programs using the "__doc__" attribute:
>>> print x_intercept.__doc__
    Return the x intercept of the line y=m*x+b.  The x intercept of a
    line is the point at which it crosses the x axis (y=0).
The pydoc module, which became part of the standard library in Python 2.1, can be used to display information about a Python object, including its docstring:
>>> from pydoc import help

>>> help(x_intercept)
Help on function x_intercept in module __main__:

x_intercept(m, b)
    Return the x intercept of the line y=m*x+b.  The x intercept of a
    line is the point at which it crosses the x axis (y=0).
For more information about Python docstrings, see the Python Tutorial or the O'Reilly Network article Python Documentation Tips and Tricks.
3.1 Variable docstrings
Python don't support directly docstrings on variables: there is no attribute that can be attached to variables and retrieved interactively like the __doc__ attribute on modules, classes and functions.
While the language doesn't directly provides for them, Epydoc supports variable docstrings: if a variable assignment statement is immediately followed by a bare string literal, then that assignment is treated as a docstring for that variable. In classes, variable assignments at the class definition level are considered class variables; and assignments to instance variables in the constructor (__init__) are considered instance variables:
class A:
    x = 22
    """Docstring for class variable A.x"""

    def __init__(self, a):
        self.y = a
        """Docstring for instance variable A.y
Variables may also be documented using comment docstrings. If a variable assignment is immediately preceeded by a comment whose lines begin with the special marker '#:', or is followed on the same line by such a comment, then it is treated as a docstring for that variable:
#: docstring for x
x = 22
x = 22 #: docstring for x
Notice that variable docstrings are only available for documentation when the source code is available for parsing: it is not possible to retrieve variable
3.2 Items visibility
Any Python object (modules, classes, functions, variables...) can be public or private. Usually the object name decides the object visibility: objects whose name starts with an underscore and doesn't end with an underscore are considered private. All the other objects (including the "magic functions" such as __add__) are public.
For each module and class, Epydoc generates pages with both public and private methods. A Javascript snippet allows you to toggle the visibility of private objects.
If a module wants to hide some of the objects it contains (either defined in the module itself or imported from other modules), it can explicitly list the names if its public names in the __all__ variable.
If a module defines the __all__ variable, Epydoc uses its content to decide if the module objects are public or private.
4 The Epytext Markup Language
4.1 A Brief Introduction
Epytext is a simple lightweight markup language that lets you add formatting and structue to docstrings. Epydoc uses that formatting and structure to produce nicely formatted API documentation. The following example (which has an unusually high ratio of documentaiton to code) illustrates some of the basic features of epytext:
def x_intercept(m, b):
    """
    Return the x intercept of the line M{y=m*x+b}.  The X{x intercept}
    of a line is the point at which it crosses the x axis (M{y=0}).

    This function can be used in conjuction with L{z_transform} to
    find an arbitrary function's zeros.

    @type  m: number
    @param m: The slope of the line.
    @type  b: number
    @param b: The y intercept of the line.  The X{y intercept} of a
              line is the point at which it crosses the y axis (M{x=0}).
    @rtype:   number
    @return:  the x intercept of the line M{y=m*x+b}.
    """
    return -b/m
You can compare this function definition with the API documentation generated by epydoc. Note that:
- Paragraphs are separated by blank lines.
- Inline markup has the form "x{...}", where "x" is a single capital letter. This example uses inline markup to mark mathematical expressions ("M{...}"); terms that should be indexed ("X{...}"); and links to the documentation of other objects ("L{...}").
- Descriptions of parameters, return values, and types are marked with "@field:" or "@field arg:", where "field" identifies the kind of description, and "arg" specifies what object is described.
Epytext is intentionally very lightweight. If you wish to use a more expressive markup language, I recommend reStructuredText.
4.2 Epytext Language Overview
Epytext is a lightweight markup language for Python docstrings. The epytext markup language is used by epydoc to parse docstrings and create structured API documentation. Epytext markup is broken up into the following categories:
Block Structure divides the docstring into nested blocks of text, such as paragraphs and lists.
o Basic Blocks are the basic unit of block structure.
o Hierarchical blocks represent the nesting structure of the docstring.
Inline Markup marks regions of text within a basic block with properties, such as italics and hyperlinks.
4.3 Block Structure
Block structure is encoded using indentation, blank lines, and a handful of special character sequences.
- Indentation is used to encode the nesting structure of hierarchical blocks. The indentation of a line is defined as the number of leading spaces on that line; and the indentation of a block is typically the indentation of its first line.
- Blank lines are used to separate blocks. A blank line is a line that only contains whitespace.
- Special character sequences are used to mark the beginnings of some blocks. For example, '-' is used as a bullet for unordered list items, and '>>>' is used to mark doctest blocks.
The following sections describe how to use each type of block structure.
4.3.1 Paragraphs
A paragraph is the simplest type of basic block. It consists of one or more lines of text. Paragraphs must be left justified (i.e., every line must have the same indentation). The following example illustrates how paragraphs can be used:
| Docstring Input | Rendered Output |
|---|---|
def example(): """ This is a paragraph. Paragraphs can span multiple lines, and can contain I{inline markup}. This is another paragraph. Paragraphs are separated by blank lines. """ *[...]* |
This is a paragraph. Paragraphs can span multiple lines, and contain inline markup. This is another paragraph. Paragraphs are separated from each other by blank lines. |
4.3.2 Lists
Epytext supports both ordered and unordered lists. A list consists of one or more consecutive list items of the same type (ordered or unordered), with the same indentation. Each list item is marked by a bullet. The bullet for unordered list items is a single dash character (-). Bullets for ordered list items consist of a series of numbers followed by periods, such as 12. or 1.2.8..
List items typically consist of a bullet followed by a space and a single paragraph. The paragraph may be indented more than the list item's bullet; often, the paragraph is intended two or three characters, so that its left margin lines up with the right side of the bullet. The following example illustrates a simple ordered list.
| Docstring Input | Rendered Output |
|---|---|
def example(): """ 1. This is an ordered list item. 2. This is a another ordered list item. 3. This is a third list item. Note that the paragraph may be indented more than the bullet. """ *[...]* |
|
List items can contain more than one paragraph; and they can also contain sublists, literal blocks, and doctest blocks. All of the blocks contained by a list item must all have equal indentation, and that indentation must be greater than or equal to the indentation of the list item's bullet. If the first contained block is a paragraph, it may appear on the same line as the bullet, separated from the bullet by one or more spaces, as shown in the previous example. All other block types must follow on separate lines.
Every list must be separated from surrounding blocks by indentation:
| Docstring Input | Rendered Output |
|---|---|
def example(): """ This is a paragraph. 1. This is a list item. 2. This a second list item. - This is a sublist """ [...] |
This is a paragraph.
|
Note that sublists must be separated from the blocks in their parent list item by indentation. In particular, the following docstring generates an error, since the sublist is not separated from the paragraph in its parent list item by indentation:
| Docstring Input | Rendered Output |
|---|---|
def example(): """ 1. This is a list item. Its paragraph is indented 7 spaces. - This is a sublist. It is indented 7 spaces. """ #[...] |
L5: Error: Lists must be indented. |
The following example illustrates how lists can be used:
| Docstring Input | Rendered Output |
|---|---|
def example(): """ This is a paragraph. 1. This is a list item. - This is a sublist. - The sublist contains two items. - The second item of the sublist has its own sublist. 2. This list item contains two paragraphs and a doctest block. >>> print 'This is a doctest block' This is a doctest block This is the second paragraph. """ #[...] |
This is a paragraph.
|
Epytext will treat any line that begins with a bullet as a list item. If you want to include bullet-like text in a paragraph, then you must either ensure that it is not at the beginning of the line, or use escaping to prevent epytext from treating it as markup:
| Docstring Input | Rendered Output |
|---|---|
def example(): """ This sentence ends with the number 1. Epytext can't tell if the "1." is a bullet or part of the paragraph, so it generates an error. """ #[...] |
L4: Error: Lists must be indented. |
def example(): """ This sentence ends with the number 1. This sentence ends with the number E{1}. """ #[...] |
This sentence ends with the number 1. This sentence ends with the number 1. |
4.3.3 Sections
A section consists of a heading followed by one or more child blocks.
- The heading is a single underlined line of text. Top-level section headings are underlined with the '=' character; subsection headings are underlined with the '-' character; and subsubsection headings are underlined with the '~' character. The length of the underline must exactly match the length of the heading.
- The child blocks can be paragraphs, lists, literal blocks, doctest blocks, or sections. Each child must have equal indentation, and that indentation must be greater than or equal to the heading's indentation.
The following example illustrates how sections can be used:
| Docstring Input | Rendered Output |
|---|---|
def example(): """ This paragraph is not in any section. Section 1 ========= This is a paragraph in section 1. Section 1.1 ----------- This is a paragraph in section 1.1. Section 2 ========= This is a paragraph in section 2. """ #[...] |
Section 1 This is a paragraph in section 1. Section 1.1 This is a paragraph in section 1.1. Section 2 This is a paragraph in section 2. |
4.3.4 Literal Blocks
Literal blocks are used to represent "preformatted" text. Everything within a literal block should be displayed exactly as it appears in plaintext. In particular:
- Spaces and newlines are preserved.
- Text is shown in a monospaced font.
- Inline markup is not detected.
Literal blocks are introduced by paragraphs ending in the special sequence "::". Literal blocks end at the first line whose indentation is equal to or less than that of the paragraph that introduces them. The following example shows how literal blocks can be used:
| Docstring Input | Rendered Output |
|---|---|
def example(): """ The following is a literal block:: Literal / / Block This is a paragraph following the literal block. """ #[...] |
The following is a literal block:
Literal /
       / Block
This is a paragraph following the literal block. |
Literal blocks are indented relative to the paragraphs that introduce them; for example, in the previous example, the word "Literal" is displayed with four leading spaces, not eight. Also, note that the double colon ("::") that introduces the literal block is rendered as a single colon.
4.3.5 Doctest Blocks
Doctest blocks contain examples consisting of Python expressions and their output. Doctest blocks can be used by the doctest module to test the documented object. Doctest blocks begin with the special sequence ">>>". Doctest blocks are delimited from surrounding blocks by blank lines. Doctest blocks may not contain blank lines. The following example shows how doctest blocks can be used:
| Docstring Input | Rendered Output |
|---|---|
def example(): """ The following is a doctest block: >>> print (1+3, ... 3+5) (4, 8) >>> 'a-b-c-d-e'.split('-') ['a', 'b', 'c', 'd', 'e'] This is a paragraph following the doctest block. """ #[...] |
The following is a doctest block: >>> print (1+3, ... 3+5) (4, 8) >>> 'a-b-c-d-e'.split('-') ['a', 'b', 'c', 'd', 'e'] This is a paragraph following the doctest block. |
4.3.6 Fields
Fields are used to describe specific properties of a documented object. For example, fields can be used to define the parameters and return value of a function; the instance variables of a class; and the author of a module. Each field is marked by a field tag, which consist of an at sign ('@') followed by a field name, optionally followed by a space and a field argument, followed by a colon (':'). For example, '@return:' and '@param x:' are field tags.
Fields can contain paragraphs, lists, literal blocks, and doctest blocks. All of the blocks contained by a field must all have equal indentation, and that indentation must be greater than or equal to the indentation of the field's tag. If the first contained block is a paragraph, it may appear on the same line as the field tag, separated from the field tag by one or more spaces. All other block types must follow on separate lines.
Fields must be placed at the end of the docstring, after the description of the object. Fields may be included in any order.
Fields do not need to be separated from other blocks by a blank line. Any line that begins with a field tag followed by a space or newline is considered a field.
The following example illustrates how fields can be used:
| Docstring Input | Rendered Output |
|---|---|
def example(): """ @param x: This is a description of the parameter x to a function. Note that the description is indented four spaces. @type x: This is a description of x's type. @return: This is a description of the function's return value. It contains two paragraphs. """ #[...] |
|
For a list of the fields that are supported by epydoc, see the epydoc fields chapter.
4.4 Inline Markup
Inline markup has the form 'x{...}', where x is a single capital letter that specifies how the text between the braces should be rendered. Inline markup is recognized within paragraphs and section headings. It is not recognized within literal and doctest blocks. Inline markup can contain multiple words, and can span multiple lines. Inline markup may be nested.
A matching pair of curly braces is only interpreted as inline markup if the left brace is immediately preceeded by a capital letter. So in most cases, you can use curly braces in your text without any form of escaping. However, you do need to escape curly braces when:
- You want to include a single (un-matched) curly brace.
- You want to preceed a matched pair of curly braces with a capital letter.
Note that there is no valid Python expression where a pair of matched curly braces is immediately preceeded by a capital letter (except within string literals). In particular, you never need to escape braces when writing Python dictionaries. See also escaping.
4.4.1 Basic Inline Markup
Epytext defines four types of inline markup that specify how text should be displayed:
- I{...}: Italicized text.
- B{...}: Bold-faced text.
- C{...}: Source code or a Python identifier.
- M{...}: A mathematical expression.
By default, source code is rendered in a fixed width font; and mathematical expressions are rendered in italics. But those defaults may be changed by modifying the CSS stylesheet. The following example illustrates how the four basic markup types can be used:
| Docstring Input | Rendered Output |
|---|---|
def example(): """ I{B{Inline markup} may be nested; and it may span} multiple lines. - I{Italicized text} - B{Bold-faced text} - C{Source code} - M{Math} Without the capital letter, matching braces are not interpreted as markup: C{my_dict={1:2, 3:4}}. """ #[...] |
Inline markup may be nested; and it may span multiple lines.
Without the capital letter, matching braces are not interpreted as markup: my_dict={1:2, 3:4}. |
4.4.2 URLs
The inline markup construct U{text<url>} is used to create links to external URLs and URIs. 'text' is the text that should be displayed for the link, and 'url' is the target of the link. If you wish to use the URL as the text for the link, you can simply write "U{url}". Whitespace within URL targets is ignored. In particular, URL targets may be split over multiple lines. The following example illustrates how URLs can be used:
| Docstring Input | Rendered Output |
|---|---|
def example(): """ - U{www.python.org} - U{http://www.python.org} - U{The epydoc homepage<http:// epydoc.sourceforge.net>} - U{The B{Python} homepage <www.python.org>} - U{Edward Loper<mailto:edloper@ gradient.cis.upenn.edu>} """ #[...] |
4.4.3 Documentation Crossreference Links
The inline markup construct 'L{text<object>}' is used to create links to the documentation for other Python objects. 'text' is the text that should be displayed for the link, and 'object' is the name of the Python object that should be linked to. If you wish to use the name of the Python object as the text for the link, you can simply write L{object}``. Whitespace within object names is ignored. In particular, object names may be split over multiple lines. The following example illustrates how documentation crossreference links can be used:
| Docstring Input | Rendered Output |
|---|---|
def example(): """ - L{x_transform} - L{search<re.search>} - L{The I{x-transform} function <x_transform>} """ #[...] |
In order to find the object that corresponds to a given name, epydoc checks the following locations, in order:
- If the link is made from a class or method docstring, then epydoc checks for a method, instance variable, or class variable with the given name.
- Next, epydoc looks for an object with the given name in the current module.
- Epydoc then tries to import the given name as a module. If the current module is contained in a package, then epydoc will also try importing the given name from all packages containing the current module.
- Epydoc then tries to divide the given name into a module name and an object name, and to import the object from the module. If the current module is contained in a package, then epydoc will also try importing the module name from all packages containing the current module.
- Finally, epydoc looks for a class name in any module with the given name. This is only returned if there is a single class with such name.
If no object is found that corresponds with the given name, then epydoc issues a warning.
4.4.4 Indexed Terms
Epydoc automatically creates an index of term definitions for the API documentation. The inline markup construct 'X{...}' is used to mark terms for inclusion in the index. The term itself will be italicized; and a link will be created from the index page to the location of the term in the text. The following example illustrates how index terms can be used:
| Docstring Input | Rendered Output | ||||||||
|---|---|---|---|---|---|---|---|---|---|
def example(): """ An X{index term} is a term that should be included in the index. """ #[...] |
An index term is a term that should be included in the index.
|
||||||||
4.4.5 Symbols
Symbols are used to insert special characters in your documentation. A symbol has the form 'S{code}', where code is a symbol code that specifies what character should be produced. The following example illustrates how symbols can be used to generate special characters:
| Docstring Input | Rendered Output |
|---|---|
def example(): """ Symbols can be used in equations: - S{sum}S{alpha}/x S{<=} S{beta} S{<-} and S{larr} both give left arrows. Some other arrows are S{rarr}, S{uarr}, and S{darr}. """ #[...] |
Symbols can be used in equations:
← and ← both give left arrows. Some other arrows are →, ↑, and ↓. |
Although symbols can be quite useful, you should keep in mind that they can make it harder to read your docstring in plaintext. In general, symbols should be used sparingly. For a complete list of the symbols that are currently supported, see the reference documentation for epytext.SYMBOLS.
4.4.6 Escaping
Escaping is used to write text that would otherwise be interpreted as epytext markup. Epytext was carefully constructed to minimize the need for this type of escaping; but sometimes, it is unavoidable. Escaped text has the form 'E{code}', where code is an escape code that specifies what character should be produced. If the escape code is a single character (other than '{' or '}'), then that character is produced. For example, to begin a paragraph with a dash (which would normally signal a list item), write 'E{-}'. In addition, two special escape codes are defined: 'E{lb}' produces a left curly brace ('{'); and 'E{rb}' produces a right curly brace ('}'). The following example illustrates how escaping can be used:
| Docstring Input | Rendered Output |
|---|---|
def example(): """ This paragraph ends with two colons, but does not introduce a literal blockE{:}E{:} E{-} This is not a list item. Escapes can be used to write unmatched curly braces: E{rb}E{lb} """ #[...] |
This paragraph ends with two colons, but does not introduce a literal block:: - This is not a list item. Escapes can be used to write unmatched curly braces: }{ |
4.4.7 Graphs
The inline markup construct 'G{graphtype args...}' is used to insert automatically generated graphs. The following graphs generation constructions are currently defines:
| Markup | Description |
|---|---|
| G{classtree classes...} | Display a class hierarchy for the given class or classes (including all superclasses & subclasses). If no class is specified, and the directive is used in a class's docstring, then that class's class hierarchy will be displayed. |
| G{packagetree modules...} | Display a package hierarchy for the given module or modules (including all subpackages and submodules). If no module is specified, and the directive is used in a module's docstring, then that module's package hierarchy will be displayed. |
| G{importgraph modules...} | Display an import graph for the given module or modules. If no module is specified, and the directive is used in a module's docstring, then that module's import graph will be displayed. |
| G{callgraph functions...} | Display a call graph for the given function or functions. If no function is specified, and the directive is used in a function's docstring, then that function's call graph will be displayed. |
4.5 Characters
4.5.1 Valid Characters
Valid characters for an epytext docstring are space (\040); newline (\012); and any letter, digit, or punctuation, as defined by the current locale. Control characters (\000-\010` and ``\013-\037) are not valid content characters. Tabs (\011) are expanded to spaces, using the same algorithm used by the Python parser. Carridge-return/newline pairs (\015\012) are converted to newlines.
4.5.2 Content Characters
Characters in a docstring that are not involved in markup are called content characters. Content characters are always displayed as-is. In particular, HTML codes are not passed through. For example, consider the following example:
| Docstring Input | Rendered Output |
|---|---|
def example(): """ <B>test</B> """ #[...] |
<B>test</B> |
The docstring is rendered as <B>test</B>, and not as the word "test" in bold face.
4.5.3 Spaces and Newlines
In general, spaces and newlines within docstrings are treated as soft spaces. In other words, sequences of spaces and newlines (that do not contain a blank line) are rendered as a single space, and words may wrapped at spaces. However, within literal blocks and doctest blocks, spaces and newlines are preserved, and no word-wrapping occurs; and within URL targets and documentation link targets, whitespace is ignored.
5 Epydoc Fields
Fields are used to describe specific properties of a documented object. For example, fields can be used to define the parameters and return value of a function; the instance variables of a class; and the author of a module. Each field consists of a tag, an optional argument, and a body.
- The tag is a case-insensitive word that indicates what kind of documentation is given by the field.
- The optional argument specifies what object, parameter, or group is documented by the field.
- The body contains the main contents of the field.
5.1 Field Markup
Each docstring markup langauge marks fields differently. The following table shows the basic fields syntax for each markup language. For more information, see the definition of field syntax for each markup language.
| Epytext | reStructuredText | Javadoc |
|---|---|---|
@tag: body... @tag arg: body... |
:tag: body... :tag arg: body... |
@tag body... @tag arg body... |
| Definition of epytext fields | Definition of ReStructuredText fields | Definition of Javadoc fields |
5.2 Supported Fields
The following table lists the fields that epydoc currently recognizes. Field tags are written using epytext markup; if you are using a different markup language, then you should adjust the markup accordingly.
5.2.1 Functions and Methods parameters
- @param p: ...
- A description of the parameter p for a function or method.
- @type p: ...
- The expected type for the parameter p.
- @return: ...
- The return value for a function or method.
- @rtype: ...
- The type of the return value for a function or method.
- @keyword p: ...
- A description of the keyword parameter p.
- @raise e: ...
- A description of the circumstances under which a function or method raises exception e.
These tags can be used to specify attributes of parameters and return value of function and methods. These tags are usually put in the the docstring of the function to be documented.
Note
constructor parameters
In C extension modules, extension classes cannot have a docstring attached to the __init__ function; consequently it is not possible to document parameters and exceptions raised by the class constructor. To overcome this shortcoming, the tags @param, @keyword, @type, @exception are also allowed to appear in the class docstring. In this case they refer to constructor parameters.
@param fields should be used to document any explicit parameter (including the keyword parameter). @keyword fields should only be used for non-explicit keyword parameters:
def plant(seed, *tools, **options):
    """
    @param seed: The seed that should be planted.
    @param tools: Tools that should be used to plant the seed.
    @param options: Any extra options for the planting.

    @keyword dig_deep: Plant the seed deep under ground.
    @keyword soak: Soak the seed before planting it.
    """
    #[...]
Since the @type field allows for arbitrary text, it does not automatically create a crossreference link to the specified type, and is not written in fixed-width font by default. If you want to create a crossreference link to the type, or to write the type in a fixed-width font, then you must use inline markup:
def ponder(person, time):
    """
    @param person: Who should think.
    @type person: L{Person} or L{Animal}
    @param time: How long they should think.
    @type time: C{int} or C{float}
    """
    #[...]
5.2.2 Variables parameters
- @ivar v: ...
- A description of the class instance variable v.
- @cvar v: ...
- A description of the static class variable v.
- @var v: ...
- A description of the module variable v.
- @type v: ...
- The type of the variable v.
These tags are usually put in a module or class docstring. If the sources can be parsed by Epydoc it is also possible to document the variable in their own docstrings: see variable docstrings
Epydoc considers class variables the ones defined directly defined in the class body. A common Python idiom is to create instance variables settings their default value in the class instead of the constructor (hopefully if the default is immutable...).
If you want to force Epydoc to classify as instance variable one whose default value is set at class level, you can describe it using the tag @ivar in the context of a variable docstring:
class B:
    y = 42
    """@ivar: This is an instance variable."""
5.2.3 Properties parameters
- @type: ...
- The type of the property.
The @type tag can be attached toa property docstring to specify its type.
5.2.4 Grouping and Sorting
- @group g: c1,...,cn
- Organizes a set of related children of a module or class into a group. g is the name of the group; and c1,...,cn are the names of the children in the group. To define multiple groups, use multiple group fields.
- @sort: c1,...,cn
- Specifies the sort order for the children of a module or class. c1,...,cn are the names of the children, in the order in which they should appear. Any children that are not included in this list will appear after the children from this list, in alphabetical order.
These tags can be used to present groups of related items in a logical way. They apply to modules and classes docstrings.
For the @group and @sort tags, asterisks (*) can be used to specify multiple children at once. An asterisk in a child name will match any substring:
class widget(size, weight, age):
    """
    @group Tools: zip, zap, *_tool
    @group Accessors: get_*
    @sort: get_*, set_*, unpack_*, cut
    """
    #[...]
Note
group markers
It is also possible to group set of related items enclosing them into special comment starting with the group markers '#{' and '#}' The group title can be specified after the opening group marker. Example:
#{ Database access functions

def read(id):
    #[...]

def store(item):
    #[...]

def delete(id):
    #[...]

# groups can't be nested, so a closing marker is not required here.

#{ Web publish functions

def get(request):
    #[...]

def post(request):
    #[...]

#}
5.2.5 Notes and Warnings
- @note: ...
- A note about an object. Multiple note fields may be used to list separate notes.
- @attention: ...
- An important note about an object. Multiple attention fields may be used to list separate notes.
- @bug: ...
A description of a bug in an object. Multiple bug fields may be used to report separate bugs.
Note
If any @bug field is used, the HTML writer will generate a the page bug-index.html, containing links to all the items tagged with the field.
- @warning: ...
- A warning about an object. Multiple warning fields may be used to report separate warnings.
5.2.6 Status
- @version: ...
- The current version of an object.
- @todo [ver]: ...
A planned change to an object. If the optional argument ver is given, then it specifies the version for which the change will be made. Multiple todo fields may be used if multiple changes are planned.
Note
If any @todo field is used, the HTML writer will generate a the page todo-index.html, containing links to all the items tagged with the field.
- @deprecated: ...
- Indicates that an object is deprecated. The body of the field describe the reason why the object is deprecated.
- @since: ...
- The date or version when an object was first introduced.
- @status: ...
- The current status of an object.
- @change: ...
- A change log entry for this object.
- @permission: ...
- The object access permission, for systems such Zope/Plone supporting this concept. It may be used more than once to specify multiple permissions.
5.2.7 Formal Conditions
- @requires: ...
- A requirement for using an object. Multiple requires fields may be used if an object has multiple requirements.
- @precondition: ...
- A condition that must be true before an object is used. Multiple precondition fields may be used if an object has multiple preconditions.
- @postcondition: ...
- A condition that is guaranteed to be true after an object is used. Multiple postcondition fields may be used if an object has multiple postconditions.
- @invariant: ...
- A condition which should always be true for an object. Multiple invariant fields may be used if an object has multiple invariants.
5.2.8 Bibliographic Information
- @author: ...
- The author(s) of an object. Multiple author fields may be used if an object has multiple authors.
- @organization: ...
- The organization that created or maintains an object.
- @copyright: ...
- The copyright information for an object.
- @license: ...
- The licensing information for an object.
- @contact: ...
- Contact information for the author or maintainer of a module, class, function, or method. Multiple contact fields may be used if an object has multiple contacts.
5.2.9 Other fields
- @summary: ...
- A summary description for an object. This description overrides the default summary (which is constructed from the first sentence of the object's description).
- @see: ...
- A description of a related topic. see fields typically use documentation crossreference links or external hyperlinks that link to the related topic.
5.3 Fields synonyms
Several fields have synonyms, or alternate tags. The following table lists all field synonyms. Field tags are written using epytext markup; if you are using a different markup language, then you should adjust the markup accordingly.
| Name | Synonims |
|---|---|
| @param p: ... | @parameter p: ...
@arg p: ...
@argument p: ...
|
| @return: ... | @returns: ... |
| @rtype: ... | @returntype: ... |
| @raise e: ... | @raises e: ...
@except e: ...
@exception e: ...
|
| @keyword p: ... | @kwarg p: ...
@kwparam p: ...
|
| @ivar v: ... | @ivariable v: ... |
| @cvar v: ... | @cvariable v: ... |
| @var v: ... | @variable v: ... |
| @see: ... | @seealso: ... |
| @warning: ... | @warn: ... |
| @requires: ... | @require: ...
@requirement: ...
|
| @precondition: ... | @precond: ... |
| @postcondition: ... | @postcond: ... |
| @organization: ... | @org: ... |
| @copyright: ... | @(c): ... |
| @change: ... | @changed: ... |
5.4 Module metadata variables
Some module variables are commonly used as module metadata. Epydoc can use the value provided by these variables as alternate form for tags. The following table lists the recognized variables and the tag they replace. Customized metadata variables can be added using the method described in Adding New Fields.
| Tag | Variable |
|---|---|
| @author | __author__ |
| @authors | __authors__ |
| @contact | __contact__ |
| @copyright | __copyright__ |
| @license | __license__ |
| @deprecated | __deprecated__ |
| @date | __date__ |
| @version | __version__ |
5.5 Adding New Fields
New fields can be defined for the docstrings in a module using the special @newfield tag (or its synonym, @deffield). This tag has the following syntax:
@newfield tag: label [, plural ]
Where tag is the new tag that's being defined; label is a string that will be used to mark this field in the generated output; and plural is the plural form of label, if different.
New fields can be defined in any Python module. If they are defined in a package, it will be possible to use the newly defined tag from every package submodule.
Each new field will also define a metadata variable which can be used to set the field value instead of the tag. For example, if a revision tag has been defined with:
@newfield revision: Revision
then it will be possible to set a value for the field using a module variable:
__revision__ = "1234"
The following example illustrates how the @newfield can be used: Docstring Input Rendered Output
| Docstring Input | Rendered Output |
|---|---|
""" @newfield corpus: Corpus, Corpora """ def example(): """ @corpus: Bob's wordlist. @corpus: The British National Corpus. """ [...] |
Corpora:
|
Note
The module-level variable __extra_epydoc_fields__ is deprecated; use @newfield instead.
6 Alternate Markup Languages
Epydoc's default markup language is epytext, a lightweight markup language that's easy to write and to understand. But if epytext is not powerful enough for you, or doesn't suit your needs, epydoc also supports three alternate markup languages:
- reStructuredText
- is an "easy-to-read, what-you-see-is-what-you-get plaintext markup syntax". It is more powerful than epytext (e.g., it includes markup for tables and footnotes); but it is also more complex, and sometimes harder to read.
- Javadoc
- is a documentation markup language that was developed for Java. It consists of HTML, augmented by a set of special tagged fields.
- Plaintext docstrings
- are rendered verbatim (preserving whitespace).
To specify the markup language for a module, you should define a module-level string variable __docformat__, containing the name of the module's markup language. The name of the markup language may optionally be followed by a language code (such as en for English). Conventionally, the definition of the __docformat__ variable immediately follows the module's docstring:
# widget.py
"""
Graphical support for `gizmos` and `widgets`.
"""
__docformat__ = "restructuredtext en"
#[...]
To change the default markup language from the command line, use the --docformat option. For example, the following command generates API documentation for the existing regular expression package re, which uses plaintext markup:
[epydoc]$ epydoc --docformat plaintext re
6.1 reStructuredText
reStructuredText is a markup language that was developed in conjunction with Docutils. In order to parse reStructuredText docstrings, Docutils 0.3 or higher must be installed. If Docutils is not installed, then reStructuredText docstrings will be rendered as plaintext. Docutils can be downloaded from the Docutils SourceForge page.
6.1.1 Default role
Epydoc replaces the Docutils' default interpreted text role with the creation of documentation crossreference links. If you want to create a crossreference link to the somemod.Example class, you can put backquotes around your test, typing:
`somemod.Example`
6.1.2 Consolidated Fields
In addition to the standard set of fields, the reStructruedText parser also supports consolidated fields, which combine the documentation for several objects into a single field. For example, a single :Parameters: field is often used to describe all of the parameters for a function or method:
def fox_speed(size, weight, age):
    """
    Return the maximum speed for a fox.

    :Parameters:
    - `size`: The size of the fox (in meters)
    - `weight`: The weight of the fox (in stones)
    - `age`: The age of the fox (in years)
    """
    #[...]
Epydoc will automatically extract information about each parameter from this list. These consolidated fields may be written using either a bulleted list or a definition list.
- If a consolidated field is written as a bulleted list, then each list item must begin with the field's argument, marked as interpreted text, and followed by a colon or dash.
- If a consolidated field is written as a definition list, then each definition item's term should contain the field's argument, (it is not mandatory for it being marked as interpreted text).
The term classifier, if present, is used to specify the associated type. The following example shows the use of a definition list to define a consolidated field (note that docutils requires a space before and after the ':' used to mark classifiers).
def fox_speed(size, weight, age):
    """
    Return the maximum speed for a fox.

    :Parameters:
      size
        The size of the fox (in meters)
      weight : float
        The weight of the fox (in stones)
      age : int
        The age of the fox (in years)
    """
    #[...]
The following consolidated fields are currently supported by epydoc:
| Consolidated Field Tag | Corresponding Base Field Tag |
|---|---|
| :Parameters: | :param: |
| :Exceptions: | :except: |
| :Groups: | :group: |
| :Keywords: | :keyword: |
| :Variables: | :var: |
| :IVariables: | :ivar: |
| :CVariables: | :cvar: |
| :Types: | :type: |
6.1.3 Graph directives
The epydoc reStructuredText reader defines several custom directives, which can be used to automatically generate a variety of graphs. The following custom directives are currently defined:
| Directive | Description |
|---|---|
.. classtree:: [classes...]
    :dir: up|down|left|right
|
Display a class hierarchy for the given class or classes (including all superclasses & subclasses). If no class is specified, and the directive is used in a class's docstring, then that class's class hierarchy will be displayed. The dir option specifies the orientation for the graph (default=down). |
.. packagetree:: [modules...]
    :dir: up|down|left|right
    :style: uml|tree
|
Display a package hierarchy for the given module or modules (including all subpackages and submodules). If no module is specified, and the directive is used in a module's docstring, then that module's package hierarchy will be displayed. The dir option specifies the orientation for the graph (default=down). The style option specifies whether packages should be displayed in a tree, or using nested UML symbols. |
.. importgraph:: [modules...]
    :dir: up|down|left|right
|
Display an import graph for the given module or modules. If no module is specified, and the directive is used in a module's docstring, then that module's import graph will be displayed. The dir option specifies the orientation for the graph (default=left). |
.. callgraph:: [functions...]
    :dir: up|down|left|right
|
Display a call graph for the given function or functions. If no function is specified, and the directive is used in a function's docstring, then that function's call graph will be displayed. The dir option specifies the orientation for the graph (default=right). |
.. dotgraph:: [title...]
    :caption: text...
    graph...
|
Display a custom Graphviz dot graph. The body of the directive (graph...) should contain the body of a dot graph. The optional title argument, if specified, is used as the title of the graph. The optional caption option can be used to provide a caption for the graph. |
6.1.4 Colorized snippets directive
Using reStructuredText markup it is possible to specify Python snippets in a doctest block. SUch block will be colorized as in epytext Doctest Blocks.
>>> def double(x):
...     return x * 2
...
>>> print double(8)
16
Doctest block are mostly useful to be run as a part of automatized test suite using the doctest module. If the Python prompt gets in your way when you try to copy and paste and you are not interested in self-testing docstrings, the python directive will let you obtain a simple block of colorized text:
| Docstring Input | Rendered Output |
|---|---|
.. python::

    def fib(n):
        """Print a Fibonacci series."""
        a, b = 0, 1
        while b < n:
            print b,
            a, b = b, a+b
|
def fib(n): """Print a Fibonacci series.""" a, b = 0, 1 while b < n: print b, a, b = b, a+b |
6.1.5 External API links
Epydoc can be used to create hyperlinks from your package documentation towards objects defined in the API of other packages. Such links are similar to ordinary documentation crossreference links, but it is required to configure Epydoc setting up a new interpreted text role, binding it to an external API.
To create a new role, the command line option --external-api=NAME must be used. This option introduces a new interpreted text role called NAME, which can be used to refer to objects defined in an external API.
You can alternatively use a configuration file for this and all the other options: see the sample configuration file for a comprehensive example.
For example, if your program needs to programmatically use the Epydoc package itself, your docstrings may refer to functions described by Epydoc API:
If you want to print a value, you can use
the :epydoc:`apidoc.pp_apidoc()` function.
When you will generate the API documentation for such program, you will need the option --external-api=epydoc or you will get parsing errors due to the unknown role.
Of course this doesn't help to really create cross references: the --external-api option suffices to stop Epydoc complaining about unknown roles, but the text is simply rendered in a monotype font and no link is created.
What Epydoc requires to create external API links is a mapping from the names of the objects exposed by the API and the URL where such objects are actually described. Such mapping must be provided as a text file, with an object name and its URL on each line, separated by a tab character. For example the Epydoc API documentation may be represented by a file names api-objects.txt containing:
epydoc                          ->  epydoc-module.html
epydoc.apidoc                   ->  epydoc.apidoc-module.html
epydoc.apidoc.UNKNOWN           ->  epydoc.apidoc-module.html#UNKNOWN
epydoc.apidoc._pp_val           ->  epydoc.apidoc-module.html#_pp_val
epydoc.apidoc.py_src_filename   ->  epydoc.util-module.html#py_src_filename
epydoc.apidoc.pp_apidoc         ->  epydoc.apidoc-module.html#pp_apidoc
epydoc.apidoc._pp_list          ->  epydoc.apidoc-module.html#_pp_list
...                                 ...
...                                 ...
Epydoc's HTML writer indeed includes such file in its output: see HTML Files for details.
You can bind the definition file to the interpreted text role name using the command line option --external-api-file=NAME:FILENAME.In the previous example you can use:
--external-api-file=epydoc:api-objects.txt
This helps Epydoc to create relative urls: in the previous example the apidoc.pp_apidoc() label will be linked with the epydoc.apidoc-module.html#_pp_val URL.
You can specify a new root for the generated links using the last command line option: --external-api-root=NAME:STRING. STRING will be attached in front of any URL returned by the NAME text role. For example, to let your program refer to Epydoc API whose documentation is published at http://epydoc.sourceforge.net/api/ you can use the options:
--external-api-root=epydoc:http://epydoc.sourceforge.net/api/
this will let your reference apidoc.pp_apidoc() point at the right documentation.
The three options can be used any number of time, effectively allowing to link towards all the required external packages.
6.1.5.1 Names resolution
When an external API link is to be created, the required name is split along any separator ('.', '::', '->'). Everything after the first noise character (for example after an '(') is discarded.
The name fragment is looked for in the names defined in the description file: first an exact match is attempted; if no name exactly matches the required name, a partial match is attempted: the required name is compared with the trailing parts of the names in the file.
If a single name is found in this lookup, then its URL is returned. If the name is not found, or if it matches with the trailing part of many defined names, a warning is raised and the name is rendered as literal text.
6.1.5.2 Linking from standalone documents
Epydoc provides the script apirst2html.py which allows you to use the previously described interpreted text roles from any reST document. The script exposes the same interface of the standard Docutils script rst2html.py but provides the extra command line options described in External API links.
With such tool you will be able to create hypertextual documentation of your package with direct links to its API.
6.1.6 Indexed Terms in reStructuredText
Epydoc uses indexed terms to create a table of terms definitions. Indexed terms are created using the epytext markup X{...}.
If you want to create indexed terms in reStructuredText modules, you can use the term interpreted text role. For example:
| Docstring Input | Rendered Output | ||||||||
|---|---|---|---|---|---|---|---|---|---|
def example(): """ An :term:`index term` is a term that should be included in the index. """ #[...] |
An index term is a term that should be included in the index.
|
||||||||
6.2 Javadoc
Javadoc is a markup language developed by Sun Microsystems for documenting Java APIs. The epydoc implementation of Javadoc is based on the Javadoc 1.4.2 reference documentation. However, there are likely to be some minor incompatibilities between Sun's implementation and epydoc's. Known incompatibilities include:
- Epydoc does not support the Javadoc block tag @serial.
- Epydoc does not support the following Javadoc inline tags: {@docroot}, {@inheritdoc}, {@value}.
- Epydoc adds many field tags that Sun does not include, such as @var, @type, and @group.
6.2.1 Javadoc Fields
For compatibility with Javadoc, every @see field is assumed to contain a single crossreference link, unless its body is quoted, or it starts with an HTML tag. See the Javadoc reference manual for more information about how the @see field is encoded in Javadoc.
Because Javadoc does not mark end of the optional argument, field arguments must contain exactly one word. Thus, multi-word arguments are not available in Javadoc. In particular, all group names must be single words.
7 References
7.1 Command Line Usage
Usage: epydoc.py [ACTION] [options] NAMES...
- NAMES...
- A list of the Python objects that should be documented. Objects can be specified using dotted names (such as os.path), module filenames (such as epydoc/epytext.py), or package directory names (such as epydoc/). Packages are expanded to include all sub-modules and sub-packages.
- options
--config=FILE         A configuration file, specifying additional OPTIONS
                      and/or NAMES.  This option may be repeated.
-o PATH, --output=PATH
                      The output directory.  If PATH does not exist, then it
                      will be created.
-q, --quiet           Decrease the verbosity.
-v, --verbose         Increase the verbosity.
--debug               Show full tracebacks for internal errors.
--simple-term         Do not try to use color or cursor control when
                      displaying the progress bar, warnings, or errors.

Actions:
  --html              Write HTML output.
  --text              Write plaintext output. (not implemented yet)
  --latex             Write LaTeX output.
  --dvi               Write DVI output.
  --ps                Write Postscript output.
  --pdf               Write PDF output.
  --check             Check completeness of docs.
  --pickle            Write the documentation to a pickle file.
  --version           Show epydoc's version number and exit.
  -h, --help          Show this message and exit.  For help on specific
                      topics, use "--help TOPIC".  Use "--help topics" for a
                      list of available help topics

Generation Options:
  --docformat=NAME    The default markup language for docstrings.  Defaults
                      to "epytext".
  --parse-only        Get all information from parsing (don't introspect)
  --introspect-only   Get all information from introspecting (don't parse)
  --exclude=PATTERN   Exclude modules whose dotted name matches the regular
                      expression PATTERN
  --exclude-introspect=PATTERN
                      Exclude introspection of modules whose dotted name
                      matches the regular expression PATTERN
  --exclude-parse=PATTERN
                      Exclude parsing of modules whose dotted name matches
                      the regular expression PATTERN
  --inheritance=STYLE
                      The format for showing inheritance objects.  STYLE
                      should be one of: grouped, listed, included.
  --show-private      Include private variables in the output. (default)
  --no-private        Do not include private variables in the output.
  --show-imports      List each module's imports.
  --no-imports        Do not list each module's imports. (default)
  --show-sourcecode   Include source code with syntax highlighting in the
                      HTML output. (default)
  --no-sourcecode     Do not include source code with syntax highlighting in
                      the HTML output.
  --include-log       Include a page with the process log (epydoc-log.html)

Output Options:
  --name=NAME         The documented project's name (for the navigation
                      bar).
  --css=STYLESHEET    The CSS stylesheet.  STYLESHEET can be either a
                      builtin stylesheet or the name of a CSS file.
  --url=URL           The documented project's URL (for the navigation bar).
  --navlink=HTML      HTML code for a navigation link to place in the
                      navigation bar.
  --top=PAGE          The "top" page for the HTML documentation.  PAGE can
                      be a URL, the name of a module or class, or one of the
                      special names "trees.html", "indices.html", or
                      "help.html"
  --help-file=FILE    An alternate help file.  FILE should contain the body
                      of an HTML file -- navigation bars will be added to
                      it.
  --show-frames       Include frames in the HTML output. (default)
  --no-frames         Do not include frames in the HTML output.
  --separate-classes  When generating LaTeX or PDF output, list each class
                      in its own section, instead of listing them under
                      their containing module.

API Linking Options:
  --external-api=NAME
                      Define a new API document.  A new interpreted text
                      role NAME will be added.
  --external-api-file=NAME:FILENAME
                      Use records in FILENAME to resolve objects in the API
                      named NAME.
  --external-api-root=NAME:STRING
                      Use STRING as prefix for the URL generated from the
                      API NAME.

Graph Options:
  --graph=GRAPHTYPE   Include graphs of type GRAPHTYPE in the generated
                      output.  Graphs are generated using the Graphviz dot
                      executable.  If this executable is not on the path,
                      then use --dotpath to specify its location.  This
                      option may be repeated to include multiple graph types
                      in the output.  GRAPHTYPE should be one of: all,
                      classtree, callgraph, umlclasstree.
  --dotpath=PATH      The path to the Graphviz 'dot' executable.
  --graph-font=FONT   Specify the font used to generate Graphviz graphs.
                      (e.g., helvetica or times).
  --graph-font-size=SIZE
                      Specify the font size used to generate Graphviz
                      graphs, in points.
  --pstat=FILE        A pstat output file, to be used in generating call
                      graphs.

Return Value Options:
  --fail-on-error     Return a non-zero exit status, indicating failure, if
                      any errors are encountered.
  --fail-on-warning   Return a non-zero exit status, indicating failure, if
                      any errors or warnings are encountered (not including
                      docstring warnings).
  --fail-on-docstring-warning
                      Return a non-zero exit status, indicating failure, if
                      any errors or warnings are encountered (including
                      docstring warnings).
7.2 Sample Configuration File
Configuration files, specified using the --config option, may be used to specify both the list of objects to document, and the options that should be used to document them. Configuration files are read using the standard ConfigParser module. The following example configuration file demonstrates the various options that you can set. Lines beginning with # or ; are treated as comments.
[epydoc] # Epydoc section marker (required by ConfigParser)

# The list of objects to document.  Objects can be named using
# dotted names, module filenames, or package directory names.
# Alases for this option include "objects" and "values".
modules: sys, os.path, re

# The type of output that should be generated.  Should be one
# of: html, text, latex, dvi, ps, pdf.
output: html

# The path to the output directory.  May be relative or absolute.
target: html/

# An integer indicating how verbose epydoc should be.  The default
# value is 0; negative values will supress warnings and errors;
# positive values will give more verbose output.
verbosity: 0

# A boolean value indicating that Epydoc should show a tracaback
# in case of unexpected error. By default don't show tracebacks
debug: 0

# If True, don't try to use colors or cursor control when doing
# textual output. The default False assumes a rich text prompt
simple-term: 0


### Generation options

# The default markup language for docstrings, for modules that do
# not define __docformat__.  Defaults to epytext.
docformat: epytext

# Whether or not parsing should be used to examine objects.
parse: yes

# Whether or not introspection should be used to examine objects.
introspect: yes

# Don't examine in any way the modules whose dotted name match this
# regular expression pattern.
#exclude

# Don't perform introspection on the modules whose dotted name match this
# regular expression pattern.
#exclude-introspect

# Don't perform parsing on the modules whose dotted name match this
# regular expression pattern.
#exclude-parse

# The format for showing inheritance objects.
# It should be one of: 'grouped', 'listed', 'included'.
inheritance: listed

# Whether or not to inclue private variables.  (Even if included,
# private variables will be hidden by default.)
private: yes

# Whether or not to list each module's imports.
imports: no

# Whether or not to include syntax highlighted source code in
# the output (HTML only).
sourcecode: yes

# Whether or not to includea a page with Epydoc log, containing
# effective option at the time of generation and the reported logs.
include-log: no


### Output options

# The documented project's name.
#name: Example

# The CSS stylesheet for HTML output.  Can be the name of a builtin
# stylesheet, or the name of a file.
css: white

# The documented project's URL.
#url: http://some.project/

# HTML code for the project link in the navigation bar.  If left
# unspecified, the project link will be generated based on the
# project's name and URL.
#link: <a href="somewhere">My Cool Project</a>

# The "top" page for the documentation.  Can be a URL, the name
# of a module or class, or one of the special names "trees.html",
# "indices.html", or "help.html"
#top: os.path

# An alternative help file.  The named file should contain the
# body of an HTML file; navigation bars will be added to it.
#help: my_helpfile.html

# Whether or not to include a frames-based table of contents.
frames: yes

# Whether each class should be listed in its own section when
# generating LaTeX or PDF output.
separate-classes: no


### API linking options

# Define a new API document.  A new interpreted text role
# will be created
#external-api: epydoc

# Use the records in this file to resolve objects in the API named NAME.
#external-api-file: epydoc:api-objects.txt

# Use this URL prefix to configure the string returned for external API.
#external-api-root: epydoc:http://epydoc.sourceforge.net/api


### Graph options

# The list of graph types that should be automatically included
# in the output.  Graphs are generated using the Graphviz "dot"
# executable.  Graph types include: "classtree", "callgraph",
# "umlclass".  Use "all" to include all graph types
graph: all

# The path to the Graphviz "dot" executable, used to generate
# graphs.
dotpath: /usr/local/bin/dot

# The name of one or more pstat files (generated by the profile
# or hotshot module).  These are used to generate call graphs.
pstat: profile.out

# Specify the font used to generate Graphviz graphs.
# (e.g., helvetica or times).
graph-font: Helvetica

# Specify the font size used to generate Graphviz graphs.
graph-font-size: 10


### Return value options

# The condition upon which Epydoc should exit with a non-zero
# exit status. Possible values are error, warning, docstring_warning
#fail-on: error
7.3 Customizing LaTeX and PDF Output
Epydoc's LaTeX output, and the outputs that are derived from it (dvi, ps, and pdf), can be customized by creating a custom LaTeX style file. To help you create custom stylesheets, a complete description of the specialized LaTeX commands that epydoc uses to generate its output is available here:
Additionaly, you may find it useful to look at the builtin style files that epydoc provides:
7.4 Warnings and Errors
If epydoc encounters an error while processing a docstring, it issues a warning message that describes the error, and attempts to continue generating documentation. Errors related to epytext are divided into three categories:
- Epytext Warnings
- are caused by epytext docstrings that contain questionable or suspicious markup. Epytext warnings do not prevent the docstring in question from being parsed.
- Field Warnings
- are caused by epytext docstrings containing invalid fields. The contents of the invalid field are generally ignored.
- Epytext Errors
- are caused by epytext docstrings that contain invalid markup. Whenever an epytext error is detected, the docstring in question is treated as a plaintext docstring.
The following sections list and describe the warning messages that epydoc can generate. They are intended as a reference resource, which you can search for more information and possible causes if you encounter an error and do not understand it. These descriptions are also available in the epydoc(1) man page.
7.4.1 Epytext Warnings
- Possible mal-formatted field item.
- Epytext detected a line that looks like a field item, but is not correctly formatted. This typically occurs when the trailing colon (:) is not included in the field tag.
- Possible heading typo.
- Epytext detected a pair of lines that looks like a heading, but the number of underline characters does not match the number of characters in the heading. The number of characters in these two lines must match exactly for them to be considered a heading.
7.4.2 Field Warnings
- @param for unknown parameter param.
- A @param field was used to specify the type for a parameter that is not included in the function's signature. This is typically caused by a typo in the parameter name.
- tag did not expect an argument.
- The field tag tag was used with an argument, but it does not take one.
- tag expected an argument.
- The field tag tag was used without an argument, but it requires one.
- @type for unknown parameter param.
- A @type field was used to specify the type for a parameter that is not included in the function's signature. This is typically caused by a typo in the parameter name.
- @type for unknown variable var.
- A @type field was used to specify the type for a variable, but no other information is known about the variable. This is typically caused by a typo in the variable name.
- Unknown field tag tag.
- A docstring contains a field with the unknown tag tag.
- Redefinition of field.
- Multiple field tags define the value of field in the same docstring, but field can only take a single value.
7.4.3 Epytext Errors
- Bad link target.
- The target specified for an inline link contruction (L{...}) is not well-formed. Link targets must be valid Python identifiers.
- Bad uri target.
- The target specified for an inline uri contruction (U{...}) is not well-formed. This typically occurs if inline markup is nested inside the URI target.
- Fields must be at the top level.
- The list of fields (@param, etc.) is contained by some other block structure (such as a list or a section).
- Fields must be the final elements in an epytext string.
- The list of fields (@param, etc.) is not at the end of a docstring.
- Headings must occur at top level.
- The heading is contianed in some other block structure (such as a list).
- Improper doctest block indentation.
- The doctest block dedents past the indentation of its initial prompt line.
- Improper heading indentation.
- The heading for a section is not left-aligned with the paragraphs in the section that contains it.
- Improper paragraph indentation.
- The paragraphs within a block are not left-aligned. This error is often generated when plaintext docstrings are parsed using epytext.
- Invalid escape.
- An unknown escape sequence was used with the inline escape construction (E{...}).
- Lists must be indented.
- An unindented line immediately following a paragraph starts with a list bullet. Epydoc is not sure whether you meant to start a new list item, or meant for a paragraph to include a word that looks like a bullet. If you intended the former, then indent the list. If you intended the latter, then change the word-wrapping of the paragraph, or escape the first character of the word that looks like a bullet.
- Unbalanced '{'.
- The docstring contains unbalanced braces. Epytext requires that all braces must be balanced. To include a single unbalanced brace, use the escape sequences E{lb} (left brace) and E{rb} (right brace).
- Unbalanced '}'.
- The docstring contains unbalanced braces. Epytext requires that all braces must be balanced. To include a single unbalanced brace, use the escape sequences E{lb} (left brace) and E{rb} (right brace).
- Unknown inline markup tag.
- An unknown tag was used with the inline markup construction (x{...}).
- Wrong underline character for heading.
- The underline character used for this section heading does not indicate an appopriate section level. The '=' character should be used to underline sections; '-' for subsections; and '~' for subsubsections.